Lesson series for 3d printed footwear
LEVEL: beginner
3D Footwear Modeling in Blender 3.4
This online course is the first of a series that we are releasing for those of you that want to be able to design and 3D print wearable footwear using affordable FDM printers that can work with flexible materials.
If you want to 3D print a shoe, you will first have to create a 3D model of it and in this course you will learn how to do that step by step from scratch in a free software called Blender.
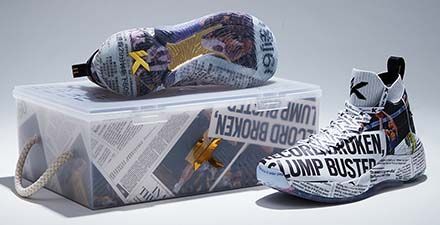
After this course you will know all the commands, tools and plugins you need to create and adjust well-fitting 3D printed shoes. You will also know how to check whether your shoe can indeed be printed and how to solve any potential printing issues in the model. Last but not least, you will learn how to make a professional render - like the one you see here - to present your design on social media.
The classes consist of clear video exercises that you can follow at your own pace, since you have access to them for 12 months. You can ask questions directly to your instructor through our online platform. You can get a certificate for this course after you sent us your completed 3D file and render.
SCROLL DOWN FOR A GREAT OFFER ON THE 3D PRINTER THAT WE USE!
If you want to 3D print a shoe, you will first have to create a 3D model of it and in this course you will learn how to do that step by step from scratch in a free software called Blender.
After this course you will know all the commands, tools and plugins you need to create and adjust well-fitting 3D printed shoes. You will also know how to check whether your shoe can indeed be printed and how to solve any potential printing issues in the model. Last but not least, you will learn how to make a professional render - like the one you see here - to present your design on social media.
The classes consist of clear video exercises that you can follow at your own pace, since you have access to them for 12 months. You can ask questions directly to your instructor through our online platform. You can get a certificate for this course after you sent us your completed 3D file and render.
SCROLL DOWN FOR A GREAT OFFER ON THE 3D PRINTER THAT WE USE!
Course Modules
Who should take this course?
Module 1 - Blender Basics
Module 2 - 3D Printable Shoe Shell
Module 3 - Rendering 3D Printed Textures
Meet your instructor
Kedar Benjamin
Kedar Benjamin - aka Benjometry - is an industrial and computational designer from Bengaluru, India. He decided to specialize in footwear after winning a shoe design contest by 3D printing company Sintratec. In the summer of 2022, right before he joined Footwearology, he was invited by Zellerfeld to design the world’s first AI-generated, commercially available 3D printed shoe. His collaboration with Dall•E 2 and Zellerfeld, Basilisk, has been printed numerous times at Footwearology LAB with various adjustments made each time for different printing methods and materials, which has further expanded our experience in design for FDM printing using Blender. Apart from Blender, Kedar is also experienced in Houdini, Grasshopper and Rhino.
Write your awesome label here.
Buy the same 3D printer that we have for only 249 euros!
Footwearology is the only academy for footwear professionals. We enable you to gain the knowledge that will get you, and the companies you work for, ready to create and embrace a better future. All our courses take place online and/or in our LAB in Barcelona, Spain.
Besides teaching, we do research and consulting, focusing on redesigning the entire footwear supply chain by directly connecting technology suppliers, creatives and social media platforms.
Besides teaching, we do research and consulting, focusing on redesigning the entire footwear supply chain by directly connecting technology suppliers, creatives and social media platforms.